In the last section we learned how to handle long term assets and depreciation in QuickBooks. Today we’ll learn how to handle bills.
There are really two ways to handle bills within QuickBooks: (1) The direct disbursement method and (2) the normal billing method.
The Direct Disbursement Method
The direct disbursement method is simple and quick. It works well on those occasions when you don’t receive a formal bill and you are just paying for an expense. It also works well when you’re paying a bill on the same day you receive it.
Let’s look at an example:

On the 21st of this year you went down to Heaven’s office supplies and purchased $450 worth of office supplies that will be used this year (stamps, paper, staplers, printer ink, etc.). $250 of this purchase is for general administrative purposes, $100 is for the missionary program, and $100 is for the youth program.
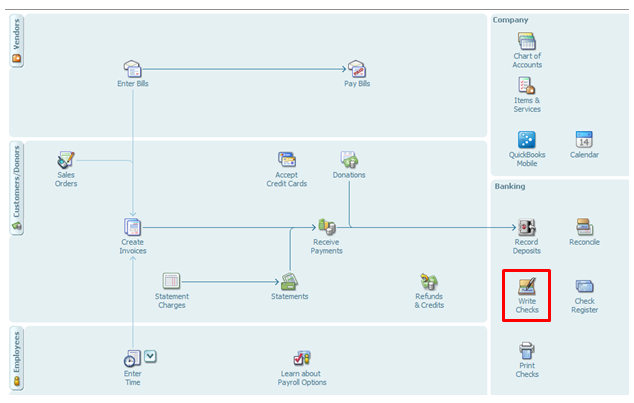
Within the QuickBooks home screen click on “Write Checks”.
Here’s what your check should look like when we’ve finished with this transaction. We’ll talk about the steps to get here below:
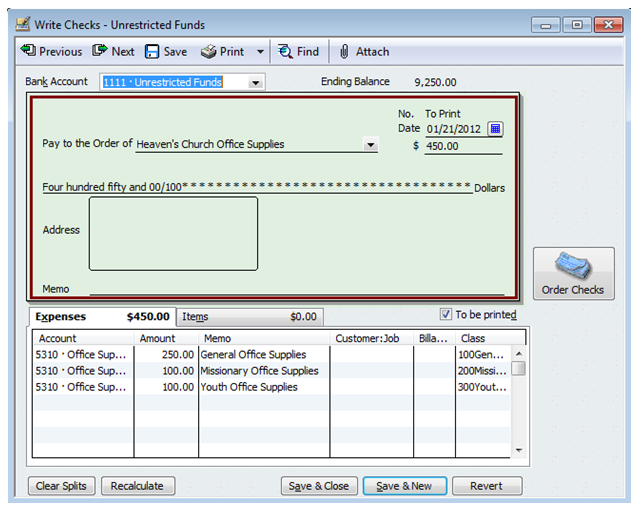
Bank Account: For the bank account, select account 1111 Unrestricted Funds. It’s true that some of this money will be used for missionary and youth programs. Unfortunately, there is no easy way in this situation to take the money from both the general fund and the temporarily restricted fund bank account. You can either enter two separate checks or you can transfer the funds from temporarily restricted to unrestricted at a later point (I'll show you how to do this at the bottom of this lesson).
Pay to the Order of: Click on the dropdown box and click “Add New”. When the next window pops up click on “Vendor” (a vendor is simply a company that sells your church something). Then, type in the vendor name and any other information you wish to add for now. Then click on “OK”.
Date: Make sure the date is correct.
Dollar Amount: Enter in the numerical dollar amount and then QuickBooks will automatically populate the written dollar amount.
Account: In your chart of accounts you should have an account for office supplies expense. It’s account #5310 for 1st Church.
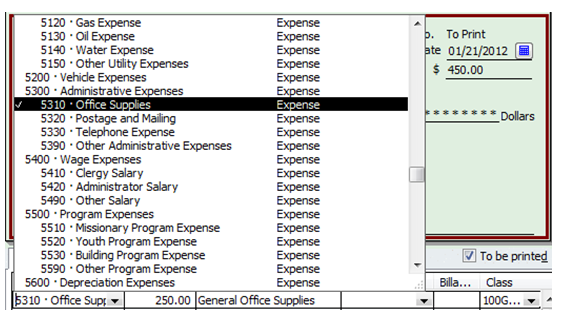
Because this expense will be charged to different programs, you’ll need to enter three lines worth of information (as pictured below).
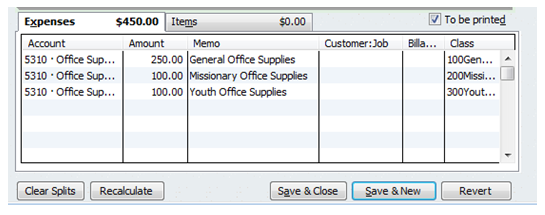
Add the correct amount to be charged to each program and then make sure you have the class assigned appropriately. This will ensure that your reports are tracking expenses by class. This makes it much easier for church management to see where money is being spent.
Note that you can print checks directly from QuickBooks if your heart so desires (a handy feature).
If I run a quick statement of activities report (income statement), this is what it will look like.
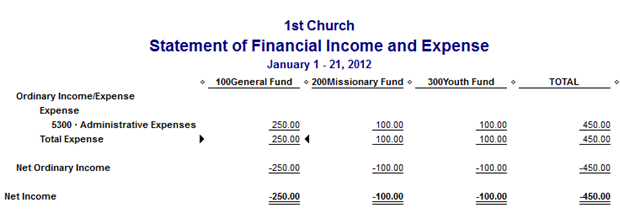
Notice that the $450 spent is allocated across the different programs making it easy for church leaders to see how money is being spent. This is much better than simply putting all $450 worth of expenses in the general fund.
Here’s a quick look at what the statement of financial position by class will look like:

Notice the -100 under the missionary and youth funds. This represents the money that was spent on office supplies for the missionary and youth programs. Instead of being represented as a -100 in the unrestricted bank account it should be taken from the temporarily restricted account. You do this by transferring funds.
Transfer Funds
In transaction #10 above the missionary program spent $100 and the youth program spent $100. We need to transfer these funds from the temporarily restricted bank account to the unrestricted bank account. Note that you won't have to do this on every transaction. It is necessary in this scenario because the money was originally taken from the unrestricted bank account even though it was used for the missionary and youth programs.
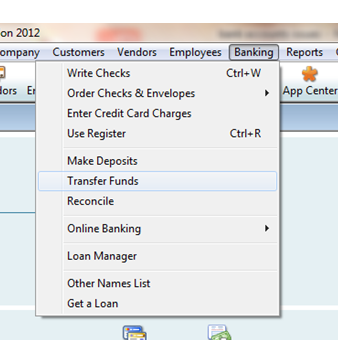
Go to Banking>>>Transfer Funds
 For the $100 spent on the missionary program make the following transfer.
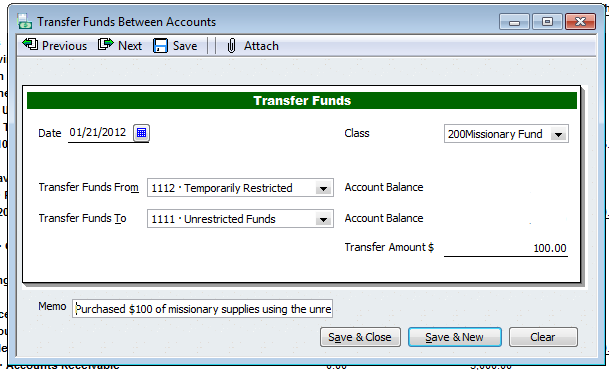
Note that the memo says, "Purchased $100 of missionary supplies using the unrestricted bank account."
For the $100 of office supplies spent on the youth make the following transfer.
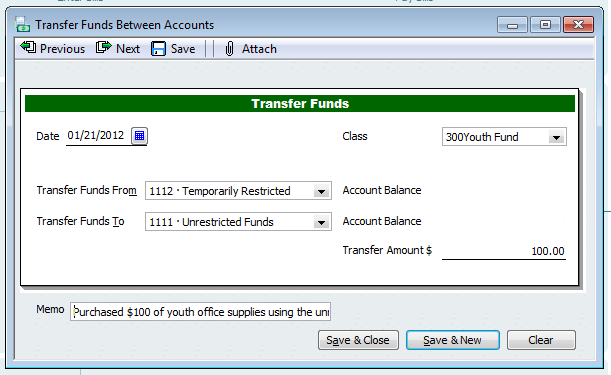
The memo says, "Purchased $100 of youth office supplies using the unrestricted bank account."
Making these transfers helps you keep better track of the amount of money in each of your programs temporarily restricted accounts. It also helps make sure that you're reporting the correct amount of unrestricted and temporarily restricted money. Here's what the statement of financial position looks like after the money transfer.

Notice the only difference is that the -100 has been moved from the unrestricted funds bank account to the temporarily restricted funds bank account.
Keep in mind that you don't actually have to go down to the bank and make a money transfer. 1st Church keeps all of its unrestricted and temporarily restricted money in one bank account at Heaven City Bank. The temporarily restricted bank account is a fictional account churches create so that they can keep track of how much temporarily restricted money they have.
Conclusion
Today we learned how to enter expense journal entries into QuickBooks using the direct disbursement method. We also learned how to transfer funds using QuickBooks. In the next lesson we’ll learn how to use the billing method for expenses.

