Accounting has a rather funny way of handling purchases of long term assets like land, buildings, and vehicles. When your church buys a new vehicle for $20,000 it isn’t considered a $20,000 expense at the time of the purchase. Instead the vehicle is placed on your statement of financial position as a long term asset and each year your church will expense a portion of that $20,000 through what is known as a depreciation expense. We’ll look at an example below.
There are certain rules that explain how much depreciation you should take each year, but it’s best to work with an accountant on this matter. For those curious I can explain these rules at a later date. Today our task is to record the purchase of a long term asset in QuickBooks. After we do that, we’ll record depreciation expense for the vehicle.
Transactions 8 and 9

On the second day of this year Pastor John at 1st Church went out and purchased a $20,000 van to be used exclusively by the church. The church took out a loan to make the purchase.
Recording this transaction requires us to make a general journal entry in QuickBooks (here’s where our journal entry work in the accounting section of this book is really going to pay off).
To get to the general journal go to “Company” on the top tool bar and then select “Make General Journal Entries”.
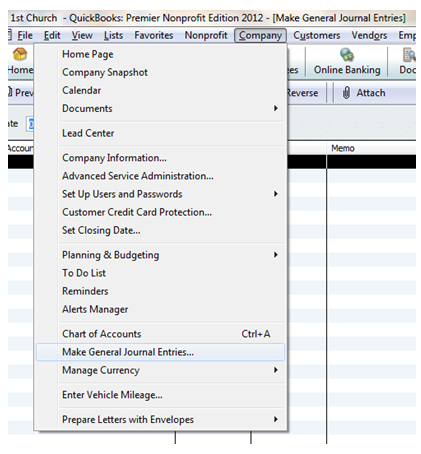
Some window will likely pop up that tells you about automatic numbering; just click “OK”.
Here’s what your journal entry is going to look like when we’re all done. I’ll walk you through the steps to get there below.
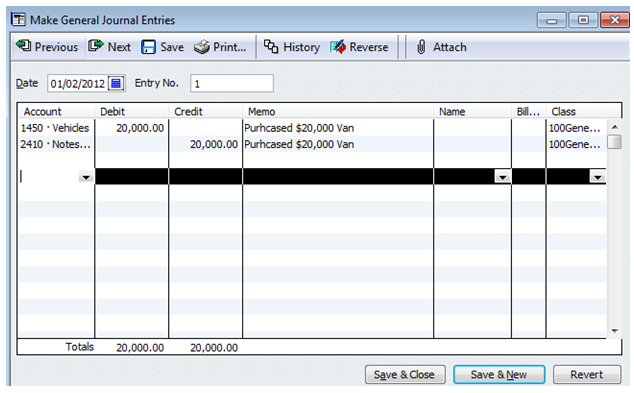
Date: Enter the date of the transaction. In this case the van was purchased on 1/02/2012.
Account: Remember from our accounting days that we debit assets when assets increase and credit liabilities when liabilities increase. Using the chart of accounts I provided for you will make entering this journal entry a breeze.
Click on the account dropdown box and then find the vehicles account under property, plants, and equipment.
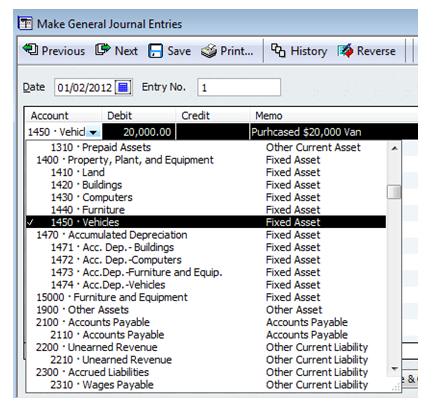
After you’ve chosen the account simply enter $20,000 as the debit amount, write a memo, and for class choose the general fund.
When you click on the next line down within the general journal you’re going to see that QuickBooks automatically enters a credit amount of $20,000. This is because QuickBooks knows that debits must equal credits.
Now find the appropriate liability account to credit. For 1st Church this is account #2410 Notes Payable to Bank.
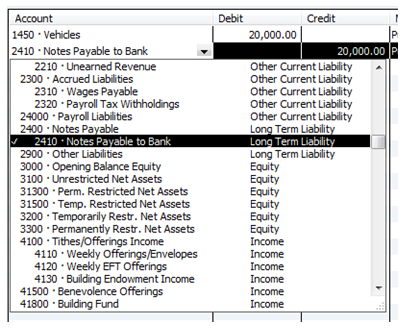
After you’ve selected the account, simply make sure the amount, memo, and class columns are filled out. At this point, click “Save & Close”.
That’s it. You’ve entered the journal entry for 1st Church’s Vehicle Purchase. Feels good to make a real journal entry doesn’t it?
If you go to the statement of financial position (balance sheet) you’ll notice that the vehicle is now listed.

Depreciation Expense
1st Church depreciates their vehicles using the straight line depreciation method. This simply means that they depreciate the same amount each year until the end of the vehicle’s useful life. Knowing the useful life of a vehicle requires an estimate. We’ll say for 1st Church that the vehicle is expected to last for five years at which point it will be taken to the dump because it will be worth nothing at that point (the youth really destroy the van if you know what I mean).
Doing some basic math: $20,000 vehicle divided by 5 years = $4,000 worth of depreciation expense each year.
Here’s transaction #9 that deals with depreciation:

Most churches make depreciation expense journal entries at the end of the year. It would be really time consuming to calculate the depreciation expense and make a journal entry for it every day. So for this example, we’re going to pretend like it’s already 12/31/2012.
Understanding Depreciation Expense
Before we make the entry in QuickBooks, let’s take a little time to understand the depreciation expense journal entry.

Depreciation is an expense. Whenever you increase an expense you debit that expense account (as shown above).
We’ve debited expenses for $4,000 but what account should we credit? Remember that when we initially purchased the $20,000 van we put the van down as a long term asset using a journal entry that looked something like this:

We’ve estimated that the van will only last for five years. That means that at the end of the year we need to reduce the long term asset by 1/5. When we reduce an asset we credit that account. That means we should credit the long term asset as shown below right???

It turns out that the above journal entry is incorrect. In the accounting world we don’t credit the long term asset in this situation. Instead we credit a rather intriguing account known as accumulated depreciation. Accumulated depreciation is a contra-asset account (yes contra-asset is a weird word).
This contra-asset account reduces the amount of the long-term asset (the vehicle in this case) on the statement of financial position.
Note: A contra-asset account does what it sounds like it does: an increase in a contra-asset account means a decrease in total assets. Think of it as an anti-asset account.
Why not simply credit the long term asset you ask?
Many budding accountants wonder why accountants have gone through all the trouble of making up a contra-asset account to reduce long term assets. Why not just credit the long-term asset to reduce it? Creating an accumulated depreciation (contra-asset) account allows users to see the original purchase cost of the long term asset as well as the depreciated amount (as seen in the image below taken from 1st Church’s Statement of Financial Position).

How to Enter Depreciation Expense in QuickBooks
Now that you have the general idea behind depreciation expenses, let’s take a look at how to make this entry in QuickBooks.
Open your general journal again by going to Company >>> Make General Journal Entries.
Here’s what your window will look like when you’ve completed it. I’ll talk about the steps to get there below.
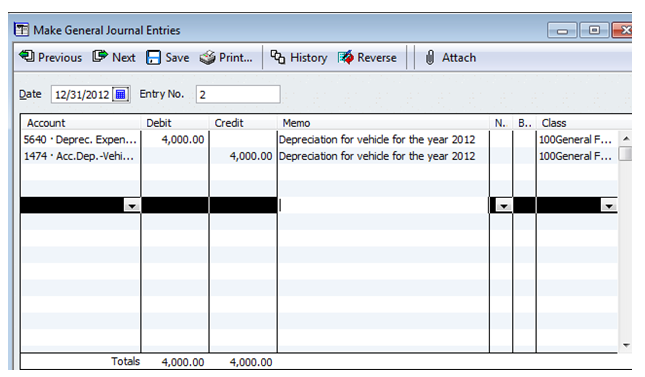
Date: Select the appropriate date. In this case the date is 12/31/2012.
Account: This is an expense. So we’re going to debit an expense account. In this case we’re debiting account 5640 Deprec. Expense- Vehicles.
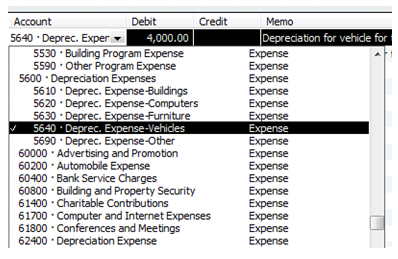
Notice that this is a subaccount of total depreciation expenses. This will make it so your leaders can look at a general report that shows them the total depreciation expenses or they can look at a more detailed report that will show them the depreciation expense for each category of long term assets.
Account: The second account on this journal entry is accumulated depreciation (the contra-asset account that we talked about above).
Once you get the accounts correct, then the rest of this journal entry is easy. Just make sure the debits and credits are correct. Also make sure you assign this to the general fund. The missionary and youth programs will be using this vehicle and we’ll talk about how to allocate the expense to those programs in Lesson 38. Click “Save & Close” when you’ve finished making the entry.
Conclusion
Today we learned how to make general journal entries in QuickBooks. We made the entries for the purchase of a new long term asset and we also made a depreciation journal entry. This is advanced stuff so good job if you’ve made it this far. In the next lesson we’ll learn how to enter bills.

